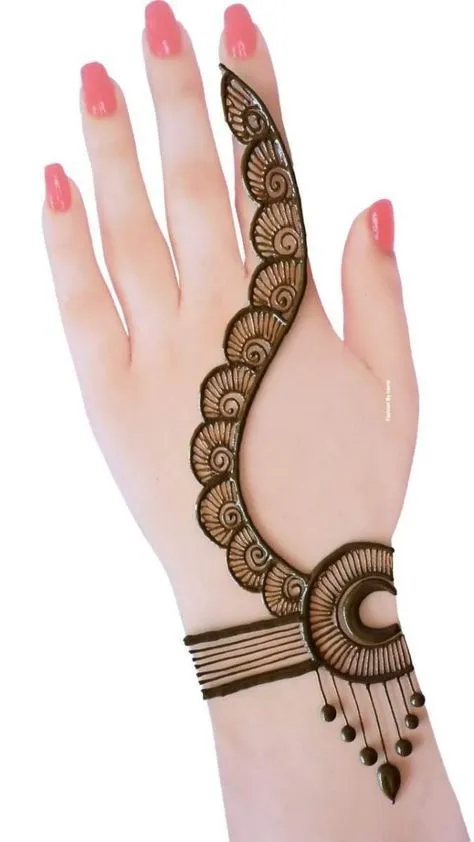
Wearing henna cannot only be during weddings and events but it is also very common in daily activities. Easy mehndi designs will suit anyone who is a novice or looking out to have a fashionable easy and simple way. Henna is applied by girls nowadays and regardless of their age, be it school girls or working women. Such designs are both easy to find and easy to implement. In this article, we will discuss simple and beginner-friendly mehndi designs that you can master with a little practice. In each paragraph you will get an idea of how to create a beautiful mehndi design using basic shapes and patterns.
Simple Flower Designs
They are simple and look beautiful too. These kinds of designs are good at the sides of the finger or at the center of the palm. For beginners, a round flower or rose pattern is perfect as it’s easy to create petal shapes. Adding small leaves or spirals between the flowers makes the design look more complete.
Dot and Line Mehndi Style
Simple look
The dot and line mehndi style looks very clean and modern. This style is perfect for college girls and casual events. It looks simple and is also quick to apply. This design matches well with Roz Marra kapron.
Dots and lines
You can adjust the dots in a row or circle. Lines can be drawn straight or curved. When you combine dots and lines, new unique shapes are created. This style looks best between the fingers and palm.
Easy homework
First, practice making dots of the same size and clean lines. It is useful to draw up the design on paper first. Press the henna cone lightly to maintain control. Speed and accuracy improve with daily practice.
Arabic inspired simple mehndi
These designs use bold strokes and empty gaps that give the design a modern feel. You can create a bold flower and use a combination of curved lines and dots with it. In the Arabic style, the fingers are not completely covered, but rather have small lines and grooves. Making a spiral flower on one side of the palm and adding leaf shapes around it makes the design beautiful. In this style, the mehndi cone has to be pressed a little thick, which creates bold lines.
Tikki Style Art
Tiki mehndi designs are classic and traditional. This design is mostly done in the center of the palm where the design starts by making a round shape as the base. Petals, leaves and dots are added around the tiki which completes the design. This design is easy for beginners as it uses symmetry and basic shapes. You draw a circle and draw straight petals around it. The design is then completed by adding small dots and side leaves.
Mandala Art Mehndi for Balance
Round balanced design
Start with the center circle
Add dots and petals
Use on palm or back of hand
Practice on paper first
Simple Finger Mehndi Designs
Finger mehndi plans are perfect for those who need speedy and brief plans. In this fashion as it were the fingers are beautified and the palm is cleared out for the most part uncovered. You can utilize parallel lines, specks and little bloom shapes on your fingertips. Winding designs on one finger and basic lines on the other make an assortment of plans. Finger mehndi gives a cutting edge see and apprentices can utilize basic plans.
You can draw clean lines utilizing the lean tip of the cone and keep the adjustment by rehashing the same design. This plan is to culminate for those who like a lighter see of henna.
Practice Tips for Beginners
Start with simple lines and dots. Then make small flower or spiral shapes. Hold the henna cone at an appropriate angle and keep the press light. Draw the pattern on a piece of rough paper before starting the design. Before applying henna on hands, the surface should be clean and dry. After a while check the tip of the cone to see if it is getting blocked. To make the color darker, you can apply a mixture of lemon and sugar after applying henna. With a lot of practice, you gain both speed and control.
Conclusion
One should apply simple mehndi patterns, when he or she is a novice or wants something easy and neat. The floral dot lines and tiki design is very simple and fashionable. After a repeated attempt all designs become simple and you are also able to design new patterns using your imagination. The process of applying henna is a leisure and a fun activity that is liked by all ages. The patterns provided in this paper will be of aid to you in producing your individual mehndi style. You can easily become an expert with some practice and patience daily.
Frequently Inquired Questions
What tools to use in applying henna?
All you require is a henna cone and a clean surface.
How does the color of simple henna thicken?
After adding lemon sugar and giving it time, the color will develop.
Can we learn mehndi designs on paper?
Yes, drawing on paper to begin with is best practice.
What is the duration of finger mehndi design?
Finger design can be completed in just 10 minutes.
Mandala design is difficult for beginners?
No, it gets less demanding if you take it step by step.
What event is Tiki design best for?
It suits casual parties and family social occasions well.